Conventions
What is Connectshares?
It is a simple way of connecting your local antiX system to shared directories offered by a remote system in a local network (often known as a LAN).
It searches the LAN and displays information about the shares it finds. You nominate the shares you want to connect to and then connect.
Your nominations are saved to a file and can (optionally) be used to connect to the shares automatically each time you log in to your antiX system. If you prefer not to connect automatically at log in, connections can be made on demand, after log in, via the antiX menu.
Features
-
Connects to shares offered by Windows systems and Linux systems (often known as Samba and NFS).
-
Connections to multiple remote shares can be established simultaneously in one group action.
-
Automatically connects to shares that are not password protected.
-
For password protected shares, the user has the option of connecting automatically or manually.
Automatic connection is done without prompting for name and password.
Manual connection requires the input of name and password in order to gain access to the share. -
Connecting to shares can be automated to happen at each log in. Alternatively connections can be done on demand via the usual antiX menu (or even a desktop shortcut).
-
Connections to all share types are made without editing any files owned by root.
-
The root password is not required when configuring Connectshares, nor when connecting and disconnecting shares
-
Your normal user account is used to make the connection.
-
Connections can be disabled by share type. For example, if you only require to connect to Windows or Samba systems attempts to connect to NFS shares can be prevented.
-
Disconnecting shares may be done individually or as a group.
-
All configuration and reporting of discovered shares is done via a pseudo GUI. The command line is not used.
-
Works in both CLI (no X) and GUI environments.
-
Does not require dedicated software e.g. user space file system app, file manager or network file manager,
-
Tiny amount of storage space is used by Connectshares and related files.
Getting Started
Before a connection can be made, Connectshares needs to be provided with some information. It needs to know which remote system to connect to and whether (or not) to request a name and a password for password protected shares.
|
|
Setting up to connect to remote shares is usually done once only. |
It takes two steps. When these have been done you can then choose whether to automatically connect to the shares at each log in. This is a separate step as it is an antiX configuration rather than Connectshares one.
Setting Up Connectshares
From the antiX menu select
 Connectshares Configuration
It is a good idea to start by selecting the "Help" button. This will display a brief guide of the two steps used to set up a connection. It also describes how to use the options in the main configuration menu.
Step 1 - Discover which shares are available
From the configuration menu select
1. Find shares offered by a remote system
This searches the network for file servers and the shares they are serving. In the majority of cases servers and shares are found without a problem.
|
|
If none are shown, check: 1. The remote server is allowed to send out information 2. The local system firewall is not blocking the reply being received |
After a successful discovery, a summary is displayed from which you choose the shares to connect to your antiX system.
|
|
To connect to a Samba server you need the following from the summary: 1. The name or IP address of the remote system 2. The name of the workgroup to which shares are served 3. The name of each share you want to access |
You enter your choices in step 2.
Step 2 - Save your choice of shares in a file
From the configuration menu select
2. Nominate shares to connect from remote system
This opens the file ready for you to add the server and share details. The default configuration file is named connectshares.conf. Use this when connecting to shares from a single remote system.
|
|
To open connectshares.conf 1. Use the Tab key to move the cursor into the Files panel 2. Use the arrow keys to highlight connectshares.conf 3. Use the spacebar key to select connectshares.conf 4. Press the OK button |
Using the guidance provided, enter the information from the discovery step.
Example Configuration to Connect to Samba Shares
The following adds the details of the Samba server and shares discovered in step 1.
In summary it:
-
Specifies the remote system to connect,
-
Activates connecting to Windows and Samba shares,
-
Connects to shares that do not require a password and also those that are password protected,
-
Automatically supplies your name and password without prompting you
|
|
connectshares.conf |
For this example all other configuration values may safely be left empty.
After entering and saving the details, setting up is complete. Your saved choices will be used when connecting to the remote system.
Connecting to Remote Shares
Connecting can be done in two ways
-
On-demand (you choose when to do it),
-
Automatically each time you log in (even if you have set your antiX system to log in at boot up without prompting for your username and password)
On-Demand
From the antiX menu select
 Connectshares
Automatically
From the antiX menu select
Control Center→System→Edit Fluxbox, IceWM or JWM Settings (choose the
one you are using)
In the startup tab, edit the following section to read
|
|
startup |
|
|
It might be possible for the line to read This will remove a 2 second delay and so make your antiX system available more quickly. |
Save the file. The next time your system boots up or when you next log in the shares will be connected for you.
If you boot a laptop while you are away from your local network, Connectshares will still try to connect your shares. After a brief period it will stop and advise you that your share server cannot be reached. While it is trying to make the connection you can continue to use your system as usual.
Viewing the Connected Shares
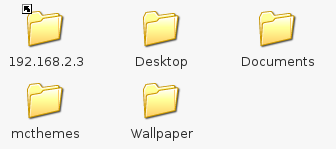
To provide easy access to the shares, a shortcut link is created in your
home directory named either with the IP address or name of the remote system.

Selecting the link in your file manager or other application displays
each of the connected shares.

Disconnecting from Remote Shares
Disconnecting can be done in two ways
-
On-demand (you choose when to do it and which shares to disconnect),
-
Automatically each time shut down your antiX system in the usual way. All shares are disconnected.
On-Demand
From the antiX menu select
 Disconnectshares
|
|
To select shares to disconnect 1. Use the arrow keys to highlight a share 2. Use the spacebar key to select the share 3. Press the OK button Choose one or more shares. |
Automatically
You don’t need to setup anything. antiX will disconnect the shares as part of its normal shut down routine.
Shares on Multiple Remote Systems
In many small office networks and also in home networks, one or more shares are served from a single system. Connectshares is well suited to use in these circumstances using its default configuration file.
In cases where multiple remote machines serve shares, Connectshares can be used by creating a separate configuration file for each remote system.
Adding an additional configuration file is a two step process
From the antiX menu select
 Connectshares Configuration
Step 1 - Discover which shares are available
Follow the same process as described previously.
Step 2 - Save your choice of shares in a file
From the configuration menu select
3. Create a new configuration file
This lets you copy a template configuration file and opens it ready to add the server and share details of the additional remote system. You may give the file any name. In this example its named connectshares-2.conf.
|
|
To create and open the new configuration file 1. Use the Tab key to move the cursor into the Files panel 2. Use the arrow keys to highlight template.conf 3. Use the spacebar key to select template.conf 4. Rename the file (e.g. connectshares-2.conf) 5. Press the OK button |
Enter the configuration into connectshares-2.conf as previously described.
Automatically Connect at Log In
From the antiX menu select
Control Center→System→Edit Fluxbox, IceWM or JWM Settings (choose
the one you are using)
In the startup tab, edit the following section to read
|
|
startup |
|
|
It might be possible to for the lines to read This will remove both 2 second delays and so make your antiX system available more quickly. |
Save the file. The next time your system boots up or when you next log in the shares from both remote systems will be connected for you.
Summary of Files
All configuration files are located in /home/USERNAME/.config/connectshares/
-
connectshares.conf is the default configuration file,
-
template.conf is the template from which additional configurations are created.
All executable files are located in /usr/local/bin/
-
connectshares in GUI a environment launches a terminal for connectshares.sh
-
connectshares.sh does the connection work
-
connectshares-config in a GUI environment a launches a terminal for connectshares-config.sh
-
connectshares-config.sh does the configuration work
-
disconnectshares in a GUI environment a launches a terminal for disconnectshares.sh
-
disconnectshares.sh does the disconnection work
|
|
To display a description of an executable file |
All menu files are located in /usr/share/applications/antix/
-
connectshares.desktop
-
connectshares-config.desktop
-
disconnectshares.desktop
All icon files are located in /usr/share/pixmaps/
-
connectshares.png
-
connectshares-config.png
-
disconnectshares.png
Video
antiX 15 - Find and Mount Network Shares by runwiththedolphin https://www.youtube.com/watch?v=pp95SzXLp7Q
